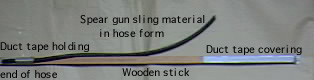
with a two inch length of tape.
( Sticks used for wet service pumps should
be completely covered with the duct or gaffer's tape to keep the wood dry. )
Start out with the stick, hose and the tape.
The stick should be about a yard or meter in length.
The hose should be about 2 to 2 1/2 feet long.
The surfaces of the hose and the stick should be
clean so that the tape will adhere to them.
Wipe the hose with an acetone moistened paper towel
to remove any excessive wax or powder.
Remove loose traces of saw dust from the stick
by sticking tape and then stripping it off again.
Toss this tape away.
|
Attach one end of the
hose to the stick
with a two inch length of tape. ( Sticks used for wet service pumps should be completely covered with the duct or gaffer's tape to keep the wood dry. ) |
| Lay the hose along the stick. Secure the
other end like you first did with the first end. Grasp both ends of the hose and it a mild stretch to ensure that it lies straight. |
 |
Cover the portion of the stick between the
two bands that hold down the hose. |
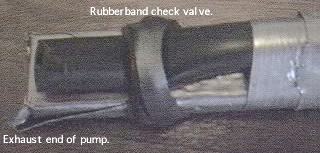 |
Attach an inflated balloon to the other or
the inlet end of the pump hose. Attach a smaller hose to the exhaust end of the pump and run the other end to a clear water filled glass cup. Look for bubbles comming out of the submerged end of the hose. Adjust the pressure of this valve by adding or removing bands or wraps to "tune" it just on the stopped side of threshold. |
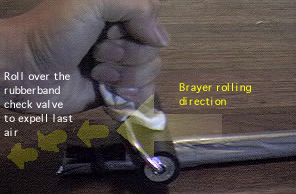
Operating the linear peristaltic air pump.
Tape the experiment end of the stick down to the
far edge of the table from where you are
standing or sitting.
After connecting an experiment or a gage to the
end of the pump, take a brayer in each hand.
Place a brayer close to the experiment end of the
hose, press down firmly and draw the brayer
towards your the check valve end of the hose. Before
running the first, place the second brayer in the starting position
and do the same while you complete rolling the first brayer
over the check valve
end.
 |
The original linear peristaltic pump devised
by Nyle Steiner did not have a check valve. You had to be careful not to lift one brayer before applying the other. Doing so would allow the air that was removed to immediately rush back into the experiment. This new design is forgiving to less than perfect operation. The check valve prevents the air from returning into the pump and the attached experiment when both brayers are lifted off the hose. Be sure that you run the brayer firmly over the valve to squeeze out the remaing air. |
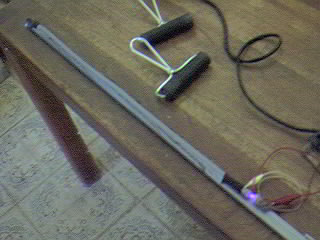
Another view of my setup.
 |
Expect more changes to these pages as I
get more pictures, information and maybe a movie of the pump operation. So far this page work has been mostly a solo effort. |
<-----Back to main page <--Back to previous page To next page--->